Contacts Admin Settings
Quick Links
As an Admin, you have the ability to customize and manage the usage of your Contacts credits. You can also opt out of the Contacts feature at any time if you desire to do so. Below in this article, you’ll learn how to access your Contacts settings and what each of them represent.
How to access Contacts admin settings
- Step 1: Log in to LeadLander at app.leadlander.com
- Step 2: Navigate to your account settings by clicking the gear icon in the top-right corner.
- Step 3: Click on the “Company Information” tab of the sidebar menu. You’ll find it below “Personal Settings” in the “Company Settings” section.
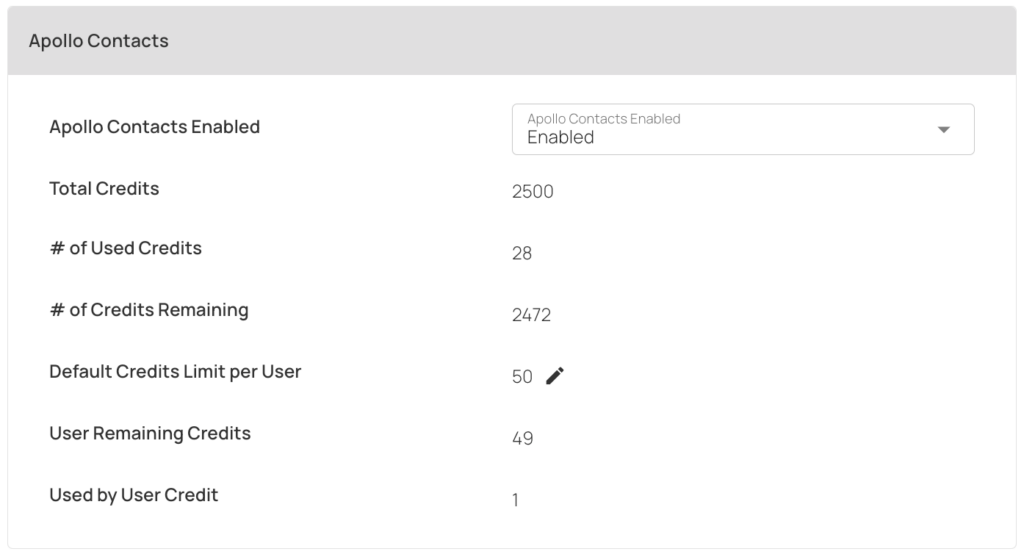
- Step 4: Scroll down to the “Contacts” settings table that appears inside the “Company information” container.
- Step 5: View and adjust your settings as needed!
Contacts admin settings walkthrough

- Contacts Enabled – This setting allows you or your account manager to Enable or Disable the Contacts feature for your entire account.
- Total Credits – This displays the full number of credits available on your account.
- # of Used Credits – This displays the total number of credits that have been spent from your account balance.
- # of Credits Remaining – This displays the balance of credits available after spend. In other words, this displays the total NET credits available on your account for users to spend.
- Default Credits Limit per User – This displays the number credits each user on your account receives by default.
- When a new user is added to your account, they will automatically receive this # of credits and have them available to spend.
- You can adjust this number by clicking the pencil icon to edit the field.
- User Remaining Credits – This displays the number of credits you have available to spend on your user account.
- Used by User Credit – This displays the number of credits you have used or spent on your own user account.
Edit Credit Limits by User

- Step 1: Log in to LeadLander at app.leadlander.com.
- Step 2: Navigate to your account settings by clicking the gear icon in the top-right corner.
- Step 3: Click on the “User Management” tab of the sidebar menu. You’ll find it below “Personal Settings” in the “Company Settings” section.
- Step 4: Scroll to the user listing table.
- You can review the “Credit Limit” and “Credit Remaining” columns to view how many Contacts credits each of your users have spent or have available.
- Step 5: Find the user you want to edit, and click the pencil icon on their record.
- Step 6: Scroll to the “Contacts Credits Limit” section of the page.
- By default, each user will have the “Use Default Limit” checkbox checked. This means that the user will have a Credit Limit that matches the “Default Credits Limit per User” in the Contacts settings table in “Company Information.”
- Step 7: To set a custom credit limit for an individual user, un-check the “Use Default Limit” checkbox.
- Step 8: Next, click the pencil icon to edit the “User Credit Limit.”
- Step 9: Once you’ve updated the “User Credit Limit” field to your desired value, click the “Submit” button at the bottom of the page.
Add Credits to Your Account
Thanks for enjoying Contacts! Please reach out directly to your account manager to purchase additional credits for your account.